
The AI Render 3D plugin now integrates 3 different tools, based on artificial intelligence models, to expand the visualization and development possibilities of ArredoCAD projects:
– AI Render allows you to quickly generate photorealistic images from the 3D view of the project.
– AI Video allows you to generate short animations from one or more images.
– Create 3D allows you to extract a three-dimensional model from a photograph.
These tools improve project presentation and speed up several stages of visual content creation.
To launch 3D AI Render , click the  button on the top toolbar. Select the desired function using the buttons at the top.
Ai Render
The “AI Render” plug-in offers the major advantage of creating a high-quality render in seconds, starting from a simple screenshot of the 3D view—without the need to configure lights and materials—or from a basic-quality render. Several preset settings (prompts) are available to generate the final image, and custom instructions can also be added, as we will see below.
When the program opens, the current 3D view will load automatically. If you want to use a previously saved rendering instead, select “Browse” to replace the image. After selecting the desired settings (Algorithm, Enhance photorealistic rendering, Daytime, Nighttime, Exterior), start the rendering process by clicking “Create Render.” 
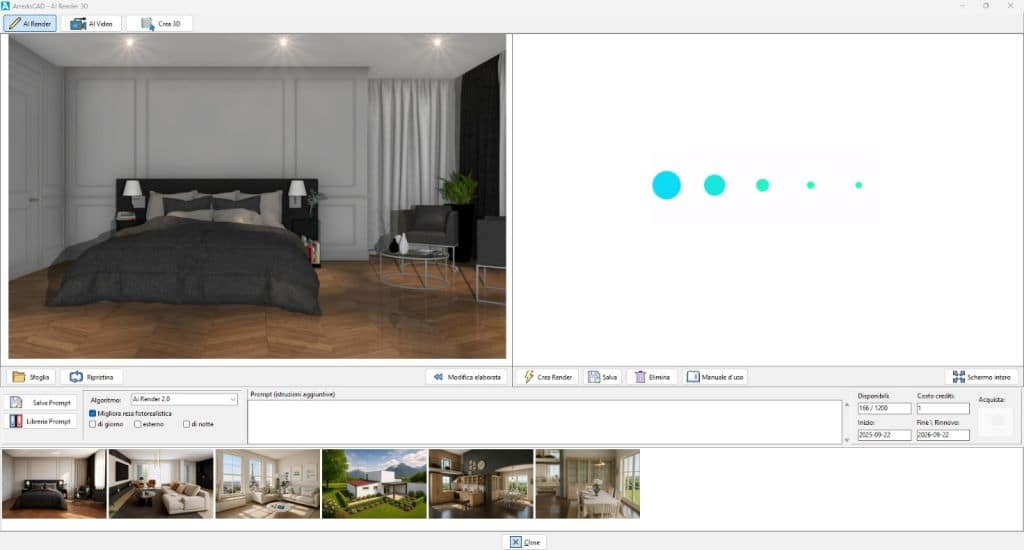
Once processing is complete, the new image appears on the right side of the window. Each new image – even if created with the same settings as the previous one – will be added to the gallery, where it remains until they are manually deleted by clicking “Delete.”
By clicking “Fullscreen”  you can view the image at a larger size. In this mode, you can switch between the two images with a left mouse click.
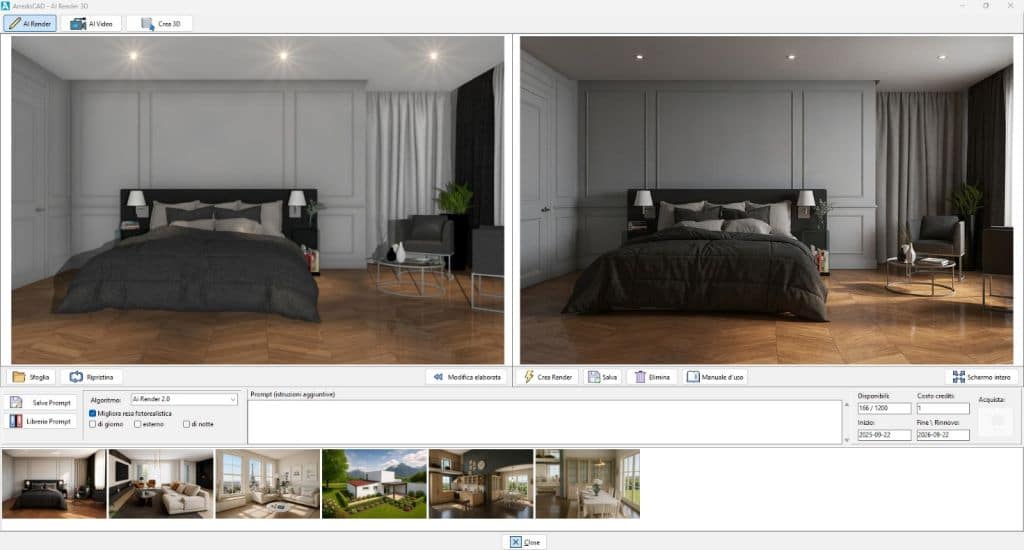
You can further process the image you just made by clicking on “Edit Processed”.  The image will be moved to the left panel, replacing the original image.
With the “Restore” command you can load again the original image.
Processing settings
There are two basic processing modes, based on two different algorithms:
- AI Render 2.0 (enabled by default) prioritizes fidelity to the original design over visual quality enhancement. The rendering process is conservative: materials, lights, shadows, and reflections are refined without visually altering the structures, geometries, materials, or lighting of the original image. This mode is recommended when design accuracy is essential. However, for maximum fidelity, it is advisable to use the D-Lux or D-Ray rendering engines, which ensure a perfectly faithful reproduction of the scene.
- AI Render 1.0 allows artificial intelligence to play a more actively role in enhancing realism, sharpness, and visual impact. It is ideal for emotional and presentation-focused or atmospheric images, where visual impact takes precedence over technical precision. Although optimized to limit deviations from the original this mode may still modify materials, colors, or details, thereby reducing fidelity to the original image.
In addition to the two processing modes, the following options affect image quality and settings:
- Improves photorealistic rendering
Determines an overall image improvement oriented toward photo realism, with natural lighting and softer shadows. - Daylight
Indicates that the scene is lit by natural daylight. AI Render automatically adjusts exposure, color temperature, and the contrast accordingly. - Nighttime
Optimizes the scene for artificial lighting, ensuring consistent handling of background lighting, varying light intensities, and deeper or softer shadows. - Outdoor
Specifies that the scene is set outdoors. AI Render emphasizes sky, environmental light, vegetation, reflections, and typical outdoor lighting conditions.
Custom prompt
The “Prompt (additional instructions)” field allows you to enter custom text instructions for image processing to better control the final result. For best results, write the prompt text clearly and concisely, providing as much detail as possible.
You can save additional instructions using the “Save Prompt” command and store them in a personal library for later reuse. To access saved prompts, click “Prompt Library.”
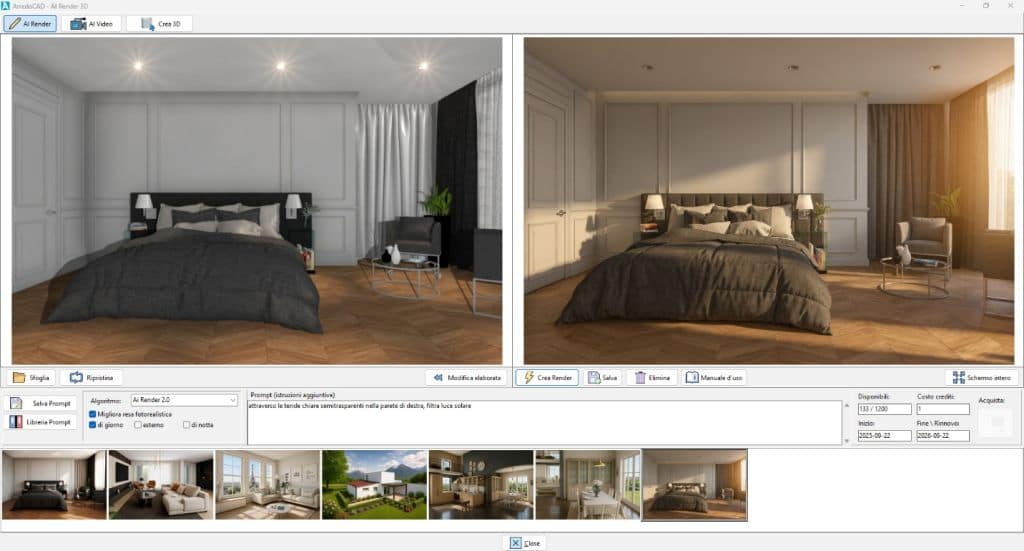
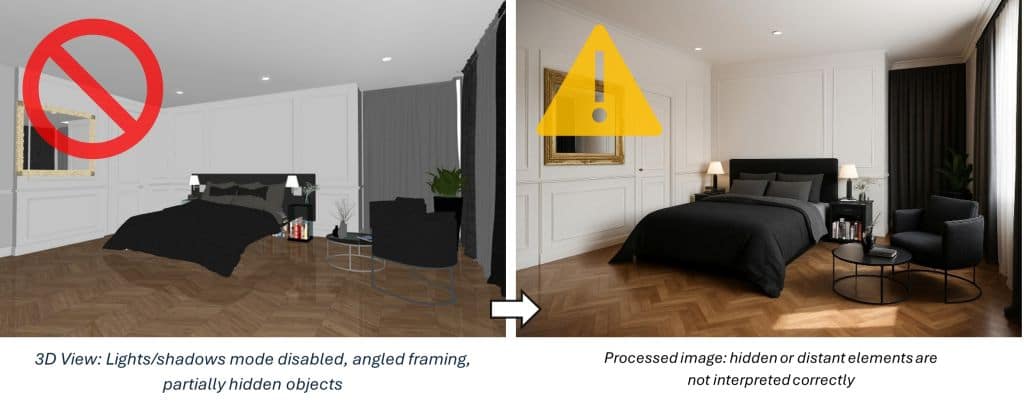
Following these guidelines will help you achieve better results. When using Ai Render 1.0, the following recommendations help minimize unwanted deviations from the original image:
- Use an image previously rendered with DLux: higher-quality source images with well-defined materials and details lead to more accurate results.
- Set a viewpoint in the 3D window that is as frontal and close as possible to the furniture you want to display, so that the image is as clear as possible. Avoid overly angled views, partially visible elements, or small details in the distance.
- Set the 3D window image to Color or Color + Lines

 mode and enable Shadows
  for better visual quality.

Ai Video
The Ai Video feature allows you to create short animations from one or more images generated with AI Render or imported from external sources. By analyzing both the images and the user’s textual instructions, the system automatically generates camera movements and smooth transitions, turning static images into engaging video clips suitable for project presentations.
For example, you can animate a render starting from a single image by adding slow camera motion, lighting changes, or atmospheric variations. The system explores the scene creatively from the original viewpoint, with results depending on the depth and spatial complexity of the scene.
The use of multiple images, on the other hand, allows us to transition from one room to another, a walk-through between different rooms, or a transition between two different furniture situations. It is possible to have more control over the final result, because the initial and final states of the animation are defined by the images.
To create a new video, drag images from the gallery into the dedicated slots on the left. The buttons in the image slots  allow you to upload external images, delete the image, and change its order. The selected images are previewed in the central area.
Once the options are set, generate the video using the “Create Video” button  . The “Browse” button
  allows you to view a previously saved video.
Video settings
Select the desired resolution and duration. The duration affects the number of credits required (Credit Cost). If you are using a vertical source image, select the 9:16 aspect ratio to generate a vertical video.
Custom prompt
The prompt can be written in Italian, but English is recommended for best results. Even a simple, straightforward prompt in English, with just a few keywords, can work better than a more elaborate sentence in Italian.
With a single image, you can, for example, use the prompt to suggest the direction of movement (slow push forward, pan left) and the desired atmosphere (cinematic, dreamlike), or to indicate that the scene should remain still (static scene, no wind).
When using two or more images, the path is calculated automatically, so there’s no need to describe it in the prompt. In this case, it’s more useful to focus on the style (architectural walkthrough, cinematic dolly) and any constraints (no object movement, frozen environment).
You can specify two separate prompts:
- Prompt — to describe the type of animation or atmosphere you want
- Negative Prompt — to specify what you want to exclude from the result (for example: wind, fabric movement, object animation)
The “Save Prompt” and “Prompt Library” buttons let you save your favorite prompts for reuse in future sessions—which is useful for maintaining a consistent style across multiple projects.
Create 3D
The Create 3D feature allows you to generate a three-dimensional model from a photograph. Using AI-based reconstruction techniques, the object in the photo is interpreted and converted into a 3D model, complete with textures, that can be used directly in ArredoCAD. The generated texture reproduces the colors and materials of the object exactly as they appear in the photo. The resulting model is a single, non-editable block: the geometry is not broken down into the object’s actual components, so it is not possible to assign different textures to individual components.
It is important to keep in mind that, by its very nature, reconstruction using artificial intelligence may produce results that do not always accurately reflect the original image—in terms of geometry, textures, or details—and therefore it is not possible to have complete control over the final result.
To extract a new 3D object, import the image using the “Browse” button  , then click “Extract OBJ”
  and select the path and filename for saving the file. You can also use multiple images of the same object taken from different angles to improve the quality of the reconstruction, as shown in the example below.
Once processed, the 3D model is displayed on the right side of the window. From this point on, you can import it into an ArredoCAD project using the 3D import function. To import 3D files created with this function into ArredoCAD, the 3D import plugin must be enabled. For more information, contact Dinamica Software.
The “Browse” button  allows you to view a previously saved 3D object.
For best results, we recommend using images that feature a single, clearly defined object against a neutral background with good lighting. Avoid highly angled perspectives or scenes with overlapping elements. For complex objects or those with parts not visible in the photo, the model may interpret the hidden areas in a way that results in an image less faithful to the actual object.
Subscription management
The three features of the AI Render 3D plugin—AI Render, AI Video, and Create 3D—are available through a single credit-based subscription. Each processing task consumes a number of credits proportional to the complexity of the operation (always indicated under “Credit Cost”), and the credit balance is shared across all three features. You can also monitor your available credits. When you purchase an AI Render 3D subscription from the online shop, the number of available credits is automatically updated in ArredoCAD.
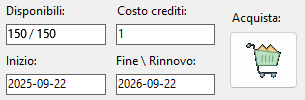
If you have multiple ArredoCAD licenses, the subscription is shared across all workstations, and the number of available credits is synchronized and automatically updated on each workstation whenever the 3D Rendering feature is accessed. It is not necessary to purchase a subscription for each active ArredoCAD license.
The renders available under the selected plan must be used before the subscription expiration date. When the subscription is automatically renewed, the credits will be reloaded (any unused credits will be reset). If the available renders are used up before the renewal date, a new subscription can be purchased.
If you install the updated version of ArredoCAD while your subscription is already active, the plugin interface will automatically display the remaining credit balance for your current subscription.