
How to use the configurator of model measures
In ArredoCAD it is possible to modify the standard measures (set by default) of the elements contained in the libraries, insert the measures of any manufacturer, save one or more configurations and recall them for future projects. It is possible to use the configurator for the following models:
- Modern and traditional kitchens
- Handleless kitchens with channel
- Transitional kitchens
- Wardrobes
- Children’s bedrooms
- Walk-in wardrobes
- Modern and traditional living room
- Bathrooms
To open one of these models, click on Model > Select main model (fig. 1) in the toolbar. If you have already downloaded the libraries of some external partners, click on the upper section ArredoCAD libraries (fig. 2), otherwise the mask Model selection will directly appear (fig. 3). For convenience, in this article we will consider the configurator of the model Modern and traditional kitchens, but the way you use them is the same for all the models with configurator.

(fig. 1)

(fig. 2)

(fig. 3)
At this point, the window of the Kitchen Configurator will open with the standard measures set by default. To create a new measure configuration, click on New in the bottom left and enter the name of the manufacturer/company in the window that will open (fig. 4).

(fig. 4)
It is possible to modify the measures set by default by replacing them with those of PRODUCER 1 – MODEL 1 (fig. 5) starting from the default measure (HB1, HB2 etc.) closest to that of your Manufacturer’s modular units, because the configurator is based on modular elements.

(fig. 5)
In fact, according to width and height, an element can be made up of one or more drawers and being parametric the measures of the configurator change the modular units.
It is possible to save more configurations for the same manufacturer if needed, considering by the way that usually you don’t use all the measurements available in the price list in a project and that it is always possible to manually create an element with special measures using the command Element properties.
It is possible to set 7 different heights for base units. The total height of a base unit is made up of the door height (fields HB1-HB7) plus the plinth height (field HZ; fig. 6).

(fig. 6)
The height HB6 is the one with more modular units available.
As to depth it is possible to set 4 different measures related to the total depth of the element (fields P1-P4) made up of the door depth (field A), the tolerance between door and structure (2mm) and the depth of the structure. For example, P3 which is by default 584 mm, is 560 mm regarding the actual measure of the structure + 22 mm of the door + 2 mm of tolerance between structure and door (fig. 7).
P1 refers, in addition to the depth of base units, to the depth of wall units and P1, P3 as well as P4 refer to the depth of tall units too.

(fig. 7)
It is possible to change configuration section by using the arrow at the top right (fig. 8) or clicking on the related tabs to be able to set also the measures of corner base units, the height of wall and tall units as well as the width of base, wall and tall units.
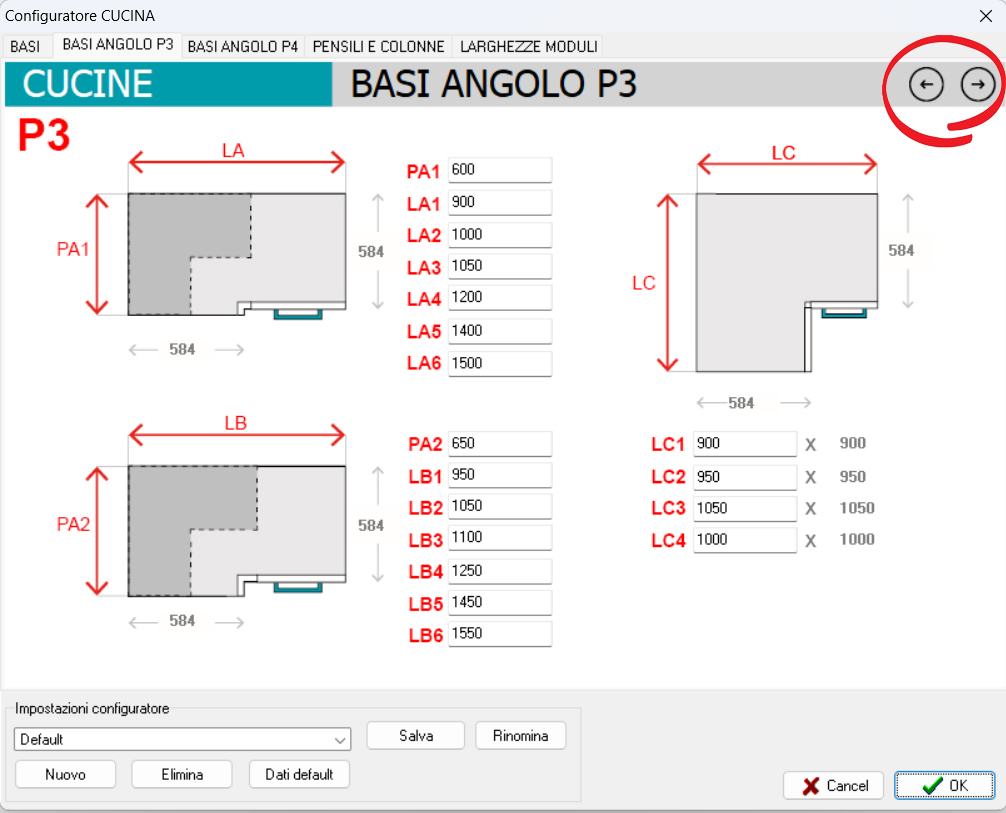
(fig. 8)
After setting your measures save the configuration by using the button Save. Now, in the element list, all elements have customized measures displayed in the related folders and subfolders to make the search easier.
The configurator can be recalled at any time from the toolbar on the left side by clicking on Generic Macros
![]() MACRO + the name of the selected model (in this case the first item KITCHEN MACROS) and by confirming with OK (fig. 9).
MACRO + the name of the selected model (in this case the first item KITCHEN MACROS) and by confirming with OK (fig. 9).

(fig. 9)
Then, in the following window, select the first item MODEL CONFIGURATOR and confirm with OK (fig. 10).

(fig. 10)
If you recall the configurator when elements have been already inserted in the project and you modify some measures, they will be automatically applied to all the elements contained in the project.